If you're a developer with multiple computers and operating systems, it can be hard to keep track of all your SSH keys. What happens if a drive fails or a laptop goes missing? Creating a simple air gap with an old USB adds an impressive layer of security and if you take a little time to prioritize servers, you'll see a significant boost in your workflow efficiency as well. The first step to creating a secure SSH keychain is wiping your USB, so back-up everything you need, and let's get that drive scrubbed clean.
Erase Your USB with Disk Utility

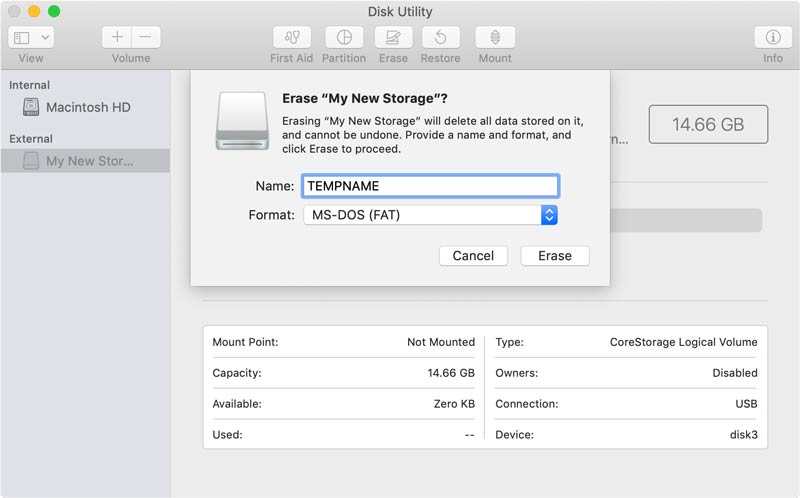
There are two basic ways to do this - We'll start with the GUI method first, then we'll cover the command line version. If you're on Linux, the command line version should still work, with a few OS-specific tweaks. Open your Disk Utility app located in /Applications/Utilities/ and select the flash drive on your left sidebar. You'll want to click the Erase tab at the top, give your USB drive a temporary name and select MS-DOS (FAT) format.
- 1) Connect your USB Key & Launch Disk Utility
- 2) Select your drive on the left hand side of Disk Utility
- 3) Click on the “Erase” tab at the top of the screen
- 4) Select MS-DOS (FAT) Format, Give Temp Name & Click Erase
If you got through those steps error-free, you now have a completely clean USB drive formatted for FAT32. Now jump down to the "Encrypt a Flash Drive on Your Mac" section to get this drive secured or you can skim over the "Erase Your USB Using CMD" section to see what is taking place behind the scenes.
Erase Your USB Using CMD
If you're looking to reformat your USB from the command line, start with your USB unplugged than enter diskutil list. This command will list connected drives, so take note of the list and see what appears after plugging your USB in (which we'll do next). In this case /dev/disk2 is my unique USB identifier.
# Heres the syntax for your command
$ diskutil eraseDisk FILESYSTEM DISKNAME DISKLOCATION

# My example looks like this
$ diskutil eraseDisk FAT32 TEMPNAME /dev/disk2
Using the above syntax, I'll plug in FILESYSTEM: FAT32, DISKNAME: TEMPNAME, & DISKLOCATION: /dev/disk2. If you need a different format for your USB, this guide is a good point of reference. Wiping the drive could take a minute, but once complete your command line output should look like this. Once you've got the USB clean, it's time to encrypt that flash drive.
Encrypt a Flash Drive on Your Mac
Whether you used Disk Utility or Command Line, you now have a clean USB drive needing encryption. This step (like the previous) can be completed with one of those two routes, we'll start with the Disk Utility option.

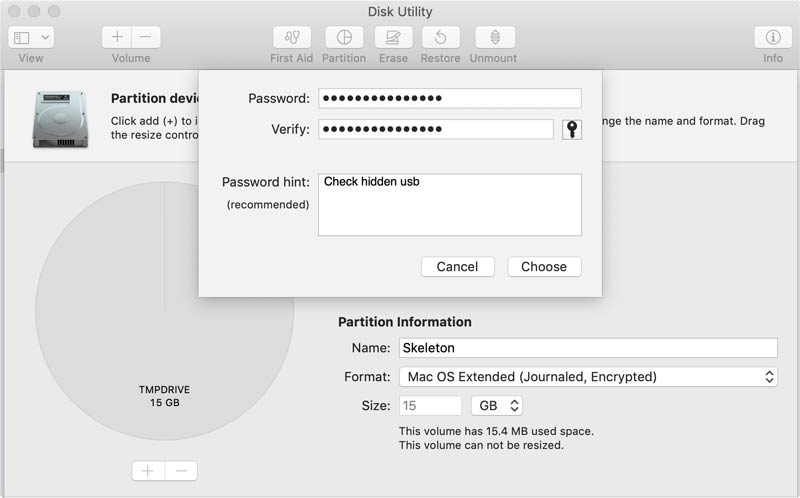
Disk Utility: With your drive selected, you'll want to click the partition button up top. Name your flash drive, select Mac OS Extended (Case-sensitive, Journaled, Encrypted) format, click "Apply", and enter your chosen password (complex & memorizable).
Command Line: If you'd like to encrypt the USB through command line, you'll need two simple commands. The syntax of the first will look like this diskutil eraseDisk JHFS+ "Skeleton" GPT disk2 and here's my command line output for reference. This command preps the drive while the following will encrypt it. The syntax of the second command looks like this diskutil cs convert disk2s2 -passphrase, resulting in this output.

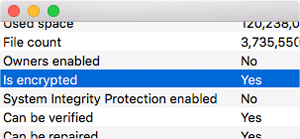
Check Your Work: The previous steps on how to encrypt a flash drive on your mac are pretty straightforward, but if you doubt the result at all you can click the flash drive's info button in Disk Utilities. Look for the line that says encrypted and as long as you see yes, we're all set to move onto the final step. Now that we have an encrypted USB, it's time to get your SSH keys in order and point your SSH config in that direction.
Managing Your SSH Keys
This post presumes you're familiar with "SSH Keys", but if you're not here's a simple definition. An SSH Key provides access like any other key, but they're generally created in pairs & used to connect to servers (as always, Wikipedia is a great place to start if you'd like to learn more). On a Mac your ".ssh folder" will be located at the user level & usually contains your SSH private keys, a config file, and "known_hosts" which automatically populates SSH connections your computer has made. My exact approach requires a few keys, but let's create one (named "key1") so we know how that looks.
$ ssh-keygen -t key1 -b 4096 -C "email@example.com"This command will generate two files in your .ssh folder, your private & public key. Generally, you want to keep the private key on your laptop & the public on the server you're looking to connect to. Since these keys provide server access, they're fairly valuable (even though that reality is often overlooked). My approach uses multiple levels each with its own key, so it might be handy to outline and prioritize your own situation. We'll continue this tutorial with 3 levels and our final SSH/Config should clarify how that looks.
Customizing Your .ssh/config
Take a quick look in your own .ssh folder to see your current setup. If you don't have one, just create a blank file named config and we can quickly run over how this file functions. It's also worth noting that users running macOS Sierra 10.12.2 or newer need to preface their SSH Config as shown on Github in order to safely store SSH key passwords.
Host basicserver
    User devteam
    HostName example.com
    IdentityFile ~/.ssh/key
Let's show you the most basic host syntax looks like. Once you've saved this config file and reloaded SSH, this block of code tells your computer what info should be included anytime you type ssh basicserver from the command prompt. In this situation, your ssh user will attempt to contact example.com as the user devteam with the SSH key located at ~/.ssh/key. At its core, this is just a time-saver for devs, but when we adjust the "IdentityFile" to target your USB key we're creating a simple air-gap that sets up a handy requirement. If you don't have your USB plugged in, you can't access that server. The implication here is simple yet wide-ranging, for example, a stolen or broken computer is no longer a reason to panic.
Let's create a simple example so you can see your SSH config at work. For simplicity sake, let's say your keys have 3 levels of importance. We'll say "level1" is a litigious multi-million dollar client, "level2" connects to your personal blog & "level3" is your Gitlab account that you use frequently and don't want on your USB key.
Host level1
    User devteam
    HostName example.com
    IdentityFile /dev/disk2/ssh/key1

Host level2
    User bloguser
    HostName example.com
    IdentityFile /dev/disk2/ssh/key2

Host level3
    User git
    HostName gitlab.com
    IdentityFile ~/.ssh/key3
Assuming you've created a folder called "ssh" on your flash drive and stored the first two keys in it, now a simple command like ssh level1 will connect easily. You will need to enter your password once, but that will be kept in your user keychain and since the "IdentityFile" specification points to your encrypted USB you should feel confident this pathway cannot be easily compromised. If you'd like to get even fancier with your ~/.ssh/config, I'd highly suggest consulting the online documentation for ssh_config. The options are numerous and pretty handy - You can specify ports, connection attempts, local environment variables, and much more.
None of these concepts are revolutionary but combined they create a fairly handy approach. I'd highly suggest creating a backup key (explained below), but tossing your handy new encrypted USB ssh keychain on your house keys is ideal for my needs. If I'm ever working on a project remotely, my house keys usually aren't too far away. In that same vein, here are a couple of tips I've adopted to save you time and increase peace of mind.
Make a Duplicate: When you have everything done, make a copy and keep it in a safe remote place (safe deposit boxes or decent hiding places are ideal)
Gather Important Security Files: Now that you have a secure key, why not include other files that should be in a more secure spot. Tax records, backup codes, important login info, pgp keys, vpn configs, database backups, etc.
I realize this approach may seem like overkill to some and potentially exploitable to others, but I've found it to be an extremely efficient way to boost security and aid workflow. If you believe any points could use clarification or you have a few solid SSH config tricks of your own, feel free to drop me a message on Twitter. Thanks for stopping by, be sure to check out some additional posts & if you've found this at all helpful, please be sure to share on your favorite social site with the links below.
$ diskutil eraseDisk FAT32 TEMPNAME /dev/disk2
Started erase on disk2
Unmounting disk
Creating the partition map
Waiting for partitions to activate
Formatting disk2s2 as MS-DOS (FAT32) with name TEMPNAME
512 bytes per physical sector
/dev/rdisk2s2: 29589248 sectors in 1849328 FAT32 clusters (8192 bytes/cluster)
bps=512 spc=16 res=32 nft=2 mid=0xf8 spt=32 hds=255 hid=411648 drv=0x80 bsec=29618176 bspf=14448 rdcl=2 infs=1 bkbs=6
Mounting disk
Finished erase on disk2
$ diskutil eraseDisk JHFS+ “Skeleton” GPT disk2
Started erase on disk2
Unmounting disk
Creating the partition map
Waiting for partitions to activate
Formatting disk2s2 as Mac OS Extended (Journaled) with name TEMPNAME
Initialized /dev/rdisk2s2 as a 14 GB case-insensitive HFS Plus volume with a 8192k journal
Mounting disk
Finished erase on disk2
$ diskutil cs convert disk2s2 -passphrase
New passphrase for converted volume:
Confirm new passphrase:
Started CoreStorage operation on disk2s2 Skeleton
Resizing disk to fit Core Storage headers
Creating Core Storage Logical Volume Group
Reviewing boot support loaders
Attempting to unmount disk2s2
Switching disk2s2 to Core Storage
Waiting for Logical Volume to appear
Mounting Logical Volume
Core Storage LVG UUID: 94FED14E-2994-45AB-B0A2-1E06DC97BA32
Core Storage PV UUID: 9F5BD1F7-0ED9-4CD3-9698-DE1296333007
Core Storage LV UUID: 4CDBA2BE-0AB3-406A-AD28-3EC1D805FB9C
Core Storage disk: disk3
Finished CoreStorage operation on disk2s2 Skeleton
Encryption pending
